A Responsive Landing Page with React.
A practical introduction to building user interfaces with React.js
There are thousands of libraries out there, each doing one little thing. Many of those libraries have grown to become “de facto” standards, but with no actual standards insight. This makes front-End development so overwhelming — at least for as far as I have known.
Well in this blog post I’ll strive to clear out all the sheer resistance that comes initially while choosing to use the React library in your projects. I’ll take you through the making of a company’s landing Page all entirely with the help of the React library.
So let’s go get a landing page up and running……!!!
How to install React on your development computer
How do you install React?
React is a library, so saying install might sound a bit weird. Maybe setup is a better word, but I hope you get the concept.
There are various ways to set up React so that it can be used on your app or site via your local development environment but in this tutorial, I’ll be using create-react-app.
How to use create-react-app.
create-react-app is a project aimed at getting you up to speed with React in no time. So here is the process….
You start by using npx, which is an easy way to download and execute Node.js commands without installing them. npx comes with npm (Node Package Manager) (since version 5.2) and if you don’t have npm installed already, do it now from https://nodejs.org (npm is installed with Node.js).
When you run npx create-react-app <app-name>, npx is going to download the most recent create-react-app release, run it, and create a file structure (boilerplate) in the folder you told it (<app-name> in this case), and initializes a Git repository.
So let’s start on the project.
Before we start, open up command prompt for Windows users and Terminal for those that use Mac or Linux and type this…..

Below is when it is finished running……..

So we now have the setup on our local development environment. You can open up a code editor, in my case Visual studio code, and start building the Landing page which will look something like this…….

The figure below shows what the landing_page folder looks like in the IDE in my case VScode is in the src folder, the red outline indicates the generated project files.
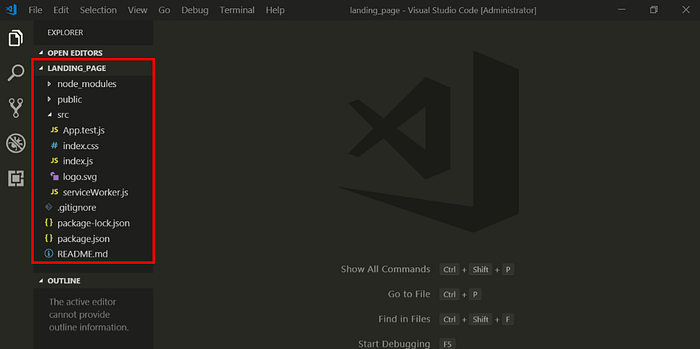
The generated project contains some files we won’t need right now, so we’ll delete them. You could also just ignore them i.e. App.css, App.js, App.test.js, serviceWorker.js.
Okay that is out of the way, now open up the file src/index.js. Delete all of the contents, and type this code in…

The import statements at the top are an ES6 feature. So, the
Statement import React from ‘react’; creates a new variable called React with the contents of the react module. The strings ‘react’ and ‘react-dom’ are important: they correspond to the names of modules installed by npm.
Import ‘ ./index.css’; provides a link to the index.css file that will be used to style our landing page from within the index.js file.
Alright, now you have to understand the fact that React is component-based and this means that we break down a project into small components that we, in the end, integrate into one parent component that houses the entire page.
Heyy!! I hope we are still together….. Let’s at this point break down our landing page into simple components.
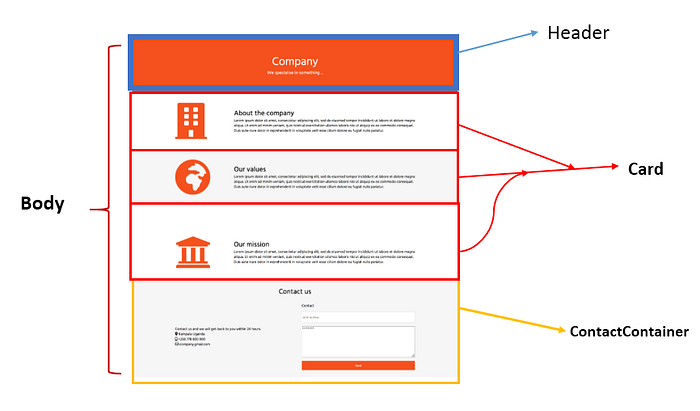
Viola!!!! We have finished identifying the components. Take note that you always have to pay great attention to detail. At this point you must have realized that the component Card is referring to three sections of the page, this is because they share a mutual layout. So it’s our duty to find the varying properties of the 3 layouts.
These are;
- Title
- Background-color
- Description
- Image/icon
This information will be useful at a later stage in this tutorial as we emphasize reusability with components.
Let’s continue with writing our code in the code editor. Add this to the index.js file.
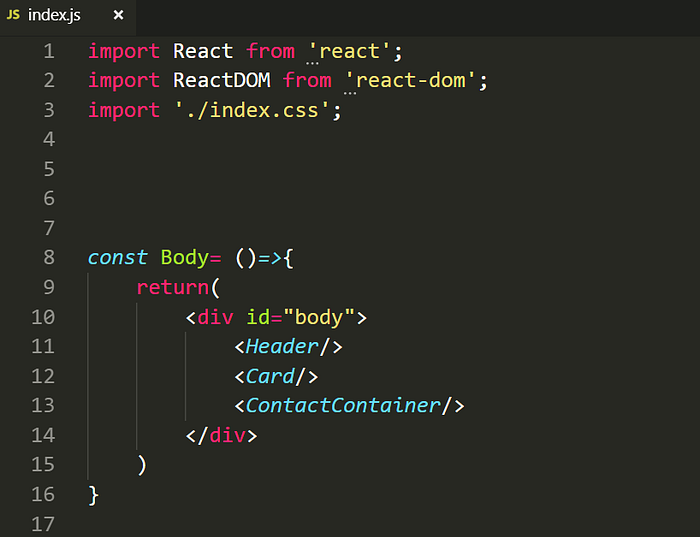
Here we have a component named Body. The primary way of writing React components is as plain functions like this. They’re commonly called “stateless function components” or just “functional components.” The body component will house the other nested components Header, Card, and ContactContainer.
Okayyyyyy…. so now with that out of the way. We can look at the other Components.

Above you can see the Header component, adapting from the landing page demo, you can realize two spans saying “Company” and “We specialize in something….” We include them into a parent div in the Header component. The parent div and the span have an attribute className which represents the class attribute in HTML syntax — React calls it a “prop” short for “property”. This will helps us to style these components from the index.css file.
Buckle up!!!!! Because now we are heading over to the Card component.
Here we shall learn a little something about Reacts’ Props.
Where HTML elements have “attributes,” React components have “props” (short for “properties”). It’s a different name for essentially the same thing. It won’t be new to your ears when I tell you that functions take in arguments. Sounds cool …..Uhhhhhhm. So where functions have arguments, React components have props. Props let you pass data to your components.
One of the first things you probably noticed about React code is that it looks like the component function is returning HTML. This HTML-like syntax is actually called JSX. What Is JSX? JSX is a syntax invented for React that looks very similar to (X) HTML. It allows you to create elements by writing in a familiar-looking syntax, instead of writing out function calls by hand. The HTML-like syntax actually compiles down to real JavaScript. Do you now get the picture? Well, hope you do.
Remember that in JSX, single braces must surround JavaScript expressions. The code in the braces is real JavaScript, and it follows all the same scoping rules as normal JavaScript.
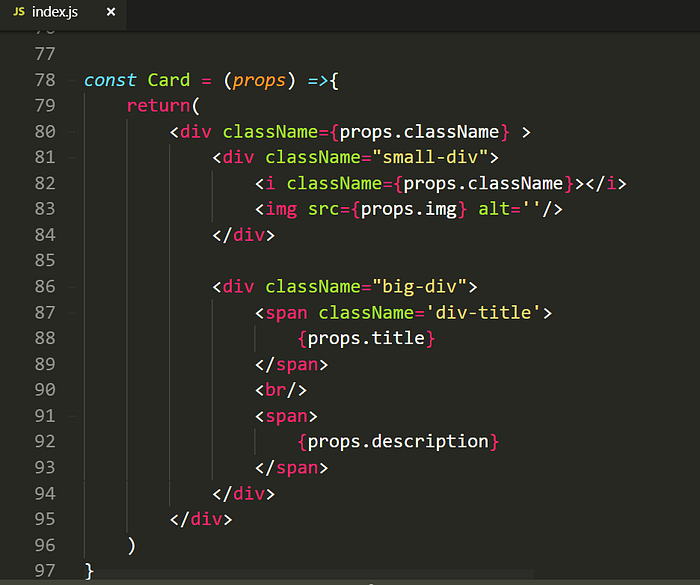
At this point, I would like to elaborate on the props argument in the Card function which refers to the properties that a particular card shall pass in on the page.
The props are:
- Title
- className
- image(img)
- Background-color
- Description
We looked at this earlier, now I’ll illustrate how it’s applied.
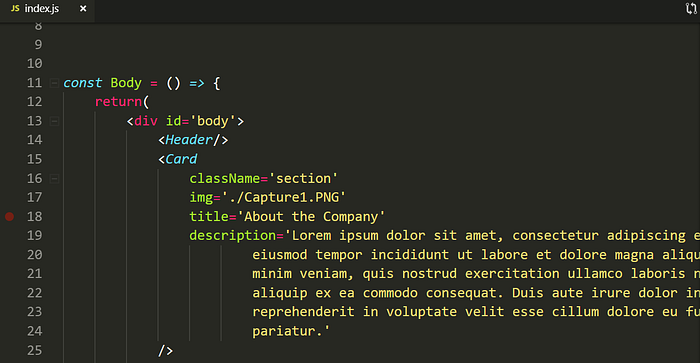
Here we can see the first card in the Body component. We add the card to the parent component which is the body, with the self-closing div i.e. <Card/>. The self-closing div is then given attributes or what React calls props, the props are then passed in via the Card component, and the, therefore, the Card component can be reused three times just by simply changing the values of the props in each instance of the card.
Hack the contact us section to completion.
At this point, I am confident that I have done a great job preparing you to be able to complete the contact us section on your own. The contact us section is one of those challenges. That is why I am giving you a chance to hack it. Don’t fret about the CSS you can just get the file contents from this link (styles.css). Before you use it, clear the contents of the current index.css file.
When you are done then include the code snippet below at the end of our code in the JS file.

This line of code is what actually makes this whole project work out. React uses the concept of a virtual DOM. It creates a representation of your component hierarchy (Header, Card, and ContactContainer) and then renders those components by creating real DOM elements and inserting them where you tell them. In this case, inside the element with an id of root. This element with the id of root exists in the index.html file inside of the public folder which is contained in the generated project files, in our case the landing_page.
ReactDOM.render takes 2 arguments: what you want to render (your component, or any other React Element) and where you want to render it (a real DOM element that already exists).
Here the first argument <body/> represents the parent component of our page and the second argument is document.getElementById(‘root’) — this points to the area in the real DOM where we want to render our landing page.
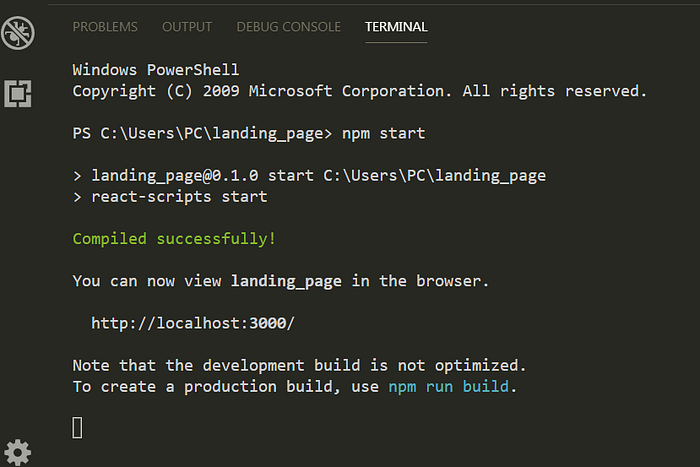
Conclusively with all that having been done, we can now run our project.
Open up the Built-in terminal of Visual Studio Code and then type npm start so as to run the project. npm start will automatically open the project in the browser window after the project has been compiled successfully.
Ohhh finally my work is done but I hope this tutorial has helped to get you up to speed with React. I know this is not all you need to know about React but I guess it’s a great quick introduction.
Happy hacking! Let me know how it goes in the comments section below.
If you found this very insightful just hit the applause and get those claps coming.
Otherwise here is the link to the finished project at CodeSand box. Click here.
🚀🚀 Next Article;
React State: what it is and how to use it.
Other Resources.
Kind Regards from me,
Be Blessed👋
Special thanks to My Facilitators Prossy Nakimera, John Kagga, and Paul Nyondo plus the Entire Andela React Community Kampala.